Hibernate 是一种 Java 语言下的对象关系映射的解决方案,它为面向对象的领域模型到传统的关系型数据库的映射提供了一个使用方便的框架。
本文讲述如何使用 Hibernate 来实现数据库中基本的增删查改操作。
创建数据库表
为实现我们的例子,我们先创建一个表EMPLOYEES并插入一些数据。
1
2
3
4
5
6
7
8
9
10
11
12
13
| CREATE TABLE EMPLOYEES (
EMP_ID BIGINT NOT NULL AUTO_INCREMENT,
NAME VARCHAR(252),
DEPARTMENT VARCHAR(128),
SALARY BIGINT,
JOINED_ON TIMESTAMP,
PRIMARY KEY (EMP_ID)
);
INSERT INTO EMPLOYEES (EMP_ID, NAME, DEPARTMENT, SALARY, JOINED_ON) VALUES (1, 'Nataraja G', 'Documentation', 10000, CURRENT_TIMESTAMP);
INSERT INTO EMPLOYEES (EMP_ID, NAME, DEPARTMENT, SALARY, JOINED_ON) VALUES (2, 'Amar M', 'Entertainment', 12000, CURRENT_TIMESTAMP);
INSERT INTO EMPLOYEES (EMP_ID, NAME, DEPARTMENT, SALARY, JOINED_ON) VALUES (3, 'Nagesh Y', 'Admin', 25000, CURRENT_TIMESTAMP);
INSERT INTO EMPLOYEES (EMP_ID, NAME, DEPARTMENT, SALARY, JOINED_ON) VALUES (4, 'Vasu V', 'Security', 2500, CURRENT_TIMESTAMP);
|
创建 Maven 项目
使用 IntelliJ IDEA 创建一个 Maven 项目,选择 quickstart 类型。

添加 Hibernate 依赖
创建 Maven 项目后,我们在 pom.xml 文件中添加 hibernate 的相关依赖。
1
2
3
4
5
6
7
8
9
10
11
12
13
14
15
16
17
18
19
20
21
22
23
24
25
26
27
28
29
30
31
32
33
34
35
36
37
38
39
40
41
42
43
44
45
46
47
48
49
50
51
52
53
54
55
56
57
58
59
60
61
62
63
64
65
66
67
68
69
70
71
72
73
74
75
76
77
78
| <?xml version="1.0" encoding="UTF-8"?>
<project xmlns="http://maven.apache.org/POM/4.0.0" xmlns:xsi="http://www.w3.org/2001/XMLSchema-instance"
xsi:schemaLocation="http://maven.apache.org/POM/4.0.0 http://maven.apache.org/xsd/maven-4.0.0.xsd">
<modelVersion>4.0.0</modelVersion>
<groupId>com.test</groupId>
<artifactId>hidemo</artifactId>
<version>1.0-SNAPSHOT</version>
<name>hidemo</name>
<url>http://www.example.com</url>
<properties>
<project.build.sourceEncoding>UTF-8</project.build.sourceEncoding>
<maven.compiler.source>1.7</maven.compiler.source>
<maven.compiler.target>1.7</maven.compiler.target>
</properties>
<dependencies>
<dependency>
<groupId>junit</groupId>
<artifactId>junit</artifactId>
<version>4.11</version>
<scope>test</scope>
</dependency>
<dependency>
<groupId>org.hibernate</groupId>
<artifactId>hibernate-core</artifactId>
<version>5.3.0.Final</version>
</dependency>
<dependency>
<groupId>mysql</groupId>
<artifactId>mysql-connector-java</artifactId>
<version>8.0.11</version>
</dependency>
</dependencies>
<build>
<pluginManagement>
<plugins>
<plugin>
<artifactId>maven-clean-plugin</artifactId>
<version>3.0.0</version>
</plugin>
<plugin>
<artifactId>maven-resources-plugin</artifactId>
<version>3.0.2</version>
</plugin>
<plugin>
<artifactId>maven-compiler-plugin</artifactId>
<version>3.7.0</version>
</plugin>
<plugin>
<artifactId>maven-surefire-plugin</artifactId>
<version>2.20.1</version>
</plugin>
<plugin>
<artifactId>maven-jar-plugin</artifactId>
<version>3.0.2</version>
</plugin>
<plugin>
<artifactId>maven-install-plugin</artifactId>
<version>2.5.2</version>
</plugin>
<plugin>
<artifactId>maven-deploy-plugin</artifactId>
<version>2.8.2</version>
</plugin>
</plugins>
</pluginManagement>
</build>
</project>
|
笔者曾试过较低版本的hibernate-core和mysql-connector-java,导致一直连接不上 MySQL 数据库,改成最新版本就正常了,故这里我们使用了当前的最新版本。
配置 hibernate.cfg.xml
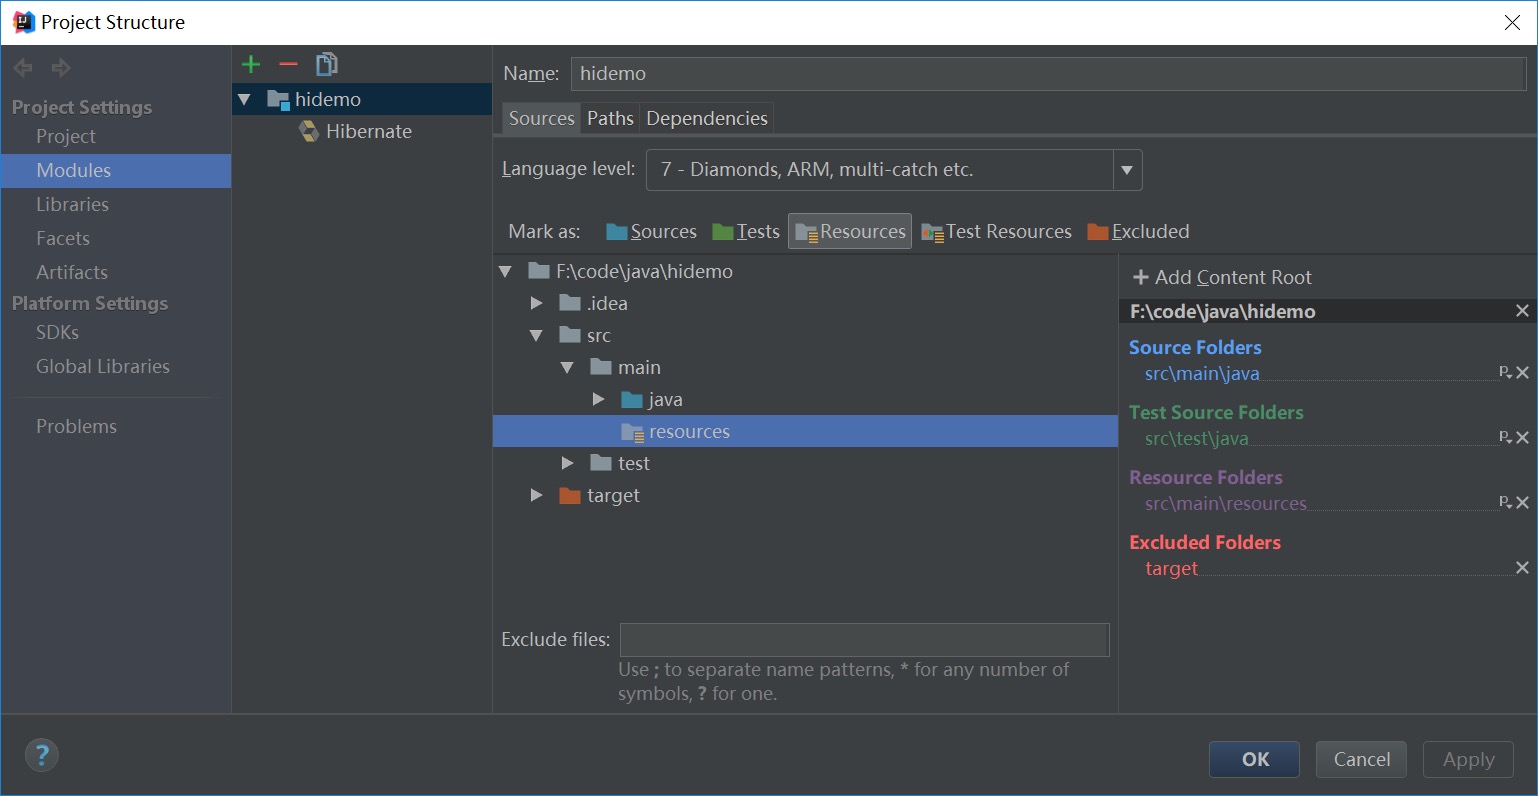
我们先来添加项目的 resources 目录。File - Project Structure,打开 Project Structure 窗口。在 Modules 选项,创建一个新的目录 resources ,并标记为 resources 目录,如图所示:
接下来在 resources 目录创建hibernate.cfg.xml文件,内容如下:
1
2
3
4
5
6
7
8
9
10
11
12
| <?xml version="1.0" encoding="utf-8"?>
<!DOCTYPE hibernate-configuration PUBLIC "-//Hibernate/Hibernate Configuration DTD 3.0//EN" "http://hibernate.sourceforge.net/hibernate-configuration-3.0.dtd">
<hibernate-configuration>
<session-factory>
<property name="hibernate.connection.driver_class">com.mysql.jdbc.Driver</property>
<property name="hibernate.connection.url">jdbc:mysql://120.78.80.23:3306/test</property>
<property name="hibernate.connection.username">root</property>
<property name="hibernate.connection.password">XXXXXXX</property>
<property name="hibernate.dialect">org.hibernate.dialect.MySQL5Dialect</property>
<property name="show_sql">false</property>
</session-factory>
</hibernate-configuration>
|
hibernate.cfg.xml文件对数据库驱动,数据库地址,用户名,密码等进行配置。为安全起见,我们省略了hibernate.connection.password的配置,读者可以根据实际情况进行配置。
编写 Hibernate 实体类
配置完成后,我们开始编写代码。我们编写一个实体类Employee,类Employee映射数据库的EMPLOYEES表。Hibernate 实体类的注解这里不作诠释,可以参考本文的参考资料。
1
2
3
4
5
6
7
8
9
10
11
12
13
14
15
16
17
18
19
20
21
22
23
24
25
26
27
28
29
30
31
32
33
34
35
36
37
38
39
40
41
42
43
44
45
46
47
48
49
50
51
52
53
54
55
56
57
58
59
60
61
62
63
64
65
66
67
68
| package com.test;
import javax.persistence.*;
import java.io.Serializable;
import java.util.Date;
@Entity
@Table(name="EMPLOYEES")
public class Employee implements Serializable {
@Id
@GeneratedValue(strategy=GenerationType.IDENTITY)
@Column(name="EMP_ID")
private Long empId;
private String name;
private String department;
private Long salary;
@Column(name="JOINED_ON")
private Date joinedOn;
public Long getEmpId() {
return empId;
}
public void setEmpId(Long empId) {
this.empId = empId;
}
public String getName() {
return name;
}
public void setName(String name) {
this.name = name;
}
public String getDepartment() {
return department;
}
public void setDepartment(String department) {
this.department = department;
}
public Long getSalary() {
return salary;
}
public void setSalary(Long salary) {
this.salary = salary;
}
public Date getJoinedOn() {
return joinedOn;
}
public void setJoinedOn(Date joinedOn) {
this.joinedOn = joinedOn;
}
@Override
public String toString() {
return this.empId+" | "+this.name+" | "+this.department+" | "+this.salary+" | "+this.joinedOn;
}
}
|
编写 Hibernate 工具类
为方便管理 hibernate session,我们实现一个 hibernate 工具类HibernateUtil。
1
2
3
4
5
6
7
8
9
10
11
12
13
14
15
16
17
18
19
20
21
22
23
24
25
26
27
28
29
30
31
32
33
34
35
36
37
38
39
40
41
42
43
44
45
46
47
48
49
50
51
| package com.test;
import org.hibernate.HibernateException;
import org.hibernate.Session;
import org.hibernate.SessionFactory;
import org.hibernate.boot.registry.StandardServiceRegistryBuilder;
import org.hibernate.cfg.Configuration;
import org.hibernate.service.ServiceRegistry;
public class HibernateUtil {
private static SessionFactory sessionFactory = null;
static {
try{
loadSessionFactory();
}catch(Exception e){
System.err.println("Exception while initializing hibernate util.. ");
e.printStackTrace();
}
}
public static void loadSessionFactory(){
Configuration configuration = new Configuration();
configuration.configure("/hibernate.cfg.xml");
configuration.addAnnotatedClass(Employee.class);
ServiceRegistry srvcReg = new StandardServiceRegistryBuilder().applySettings(configuration.getProperties()).build();
sessionFactory = configuration.buildSessionFactory(srvcReg);
}
public static Session getSession() throws HibernateException {
Session retSession=null;
try {
retSession=sessionFactory.openSession();
}catch(Throwable t){
System.err.println("Exception while getting session.. ");
t.printStackTrace();
}
if(retSession == null) {
System.err.println("session is discovered null");
}
return retSession;
}
public static void closeSessionFactory() {
if (sessionFactory != null) {
sessionFactory.close();
}
}
}
|
类HibernateUtil提供获取和关闭 session 的接口。
测试
我们编写代码利用 hibernate 来实现数据库增删查改的操作。在下面的代码中,我们先构造并往表EMPLOYEES插入一条Babu的记录,然后查询表EMPLOYEES中所有的记录并打印出来。接着,我们使用 ID 来查询指定的记录并打印出来。最后,我们删除刚插入的记录,并打印剩余的所有记录。
1
2
3
4
5
6
7
8
9
10
11
12
13
14
15
16
17
18
19
20
21
22
23
24
25
26
27
28
29
30
31
32
33
34
35
36
37
38
39
40
41
42
43
44
45
46
47
48
49
50
51
52
53
54
55
56
57
58
59
60
61
62
63
64
65
66
67
68
69
70
71
72
73
74
75
76
77
78
79
80
81
82
83
84
85
86
87
88
89
90
91
92
93
94
95
96
97
98
99
100
101
102
103
104
105
106
107
108
109
110
111
112
113
114
115
116
117
118
119
120
121
122
| package com.test;
import java.util.Date;
import java.util.List;
import org.hibernate.Query;
import org.hibernate.Session;
import org.hibernate.Transaction;
public class Hidemo {
public List<Employee> getEmployeeList() {
Session session = null;
List<Employee> empList = null;
try {
session = HibernateUtil.getSession();
String queryStr = "select emp from Employee emp";
Query query = session.createQuery(queryStr);
empList = query.list();
} catch (Exception ex) {
ex.printStackTrace();
} finally {
try {
if (session != null) {
System.out.println("close session");
session.close();
}
} catch (Exception ex) {
ex.printStackTrace();
}
}
return empList;
}
public Employee getEmployeeById(Long empId){
Session session = null;
Employee emp = null;
try {
session = HibernateUtil.getSession();
String queryStr = "select emp from Employee emp";
emp = session.get(Employee.class, empId);
} catch(Exception ex) {
ex.printStackTrace();
} finally {
try {if(session != null) session.close();} catch(Exception ex) {}
}
return emp;
}
public void insertEmployee(Employee emp) {
Session session = null;
Transaction transaction = null;
try {
session = HibernateUtil.getSession();
transaction = session.beginTransaction();
session.save(emp);
System.out.println("inserted employee: "+emp.getName());
transaction.commit();
} catch(Exception ex) {
ex.printStackTrace();
if(transaction != null) transaction.rollback();
} finally {
try {if(session != null) session.close();} catch(Exception ex) {}
}
}
public void deleteEmployee(Employee emp) {
Session session = null;
Transaction transaction = null;
try {
session = HibernateUtil.getSession();
transaction = session.beginTransaction();
session.delete(emp);
transaction.commit();
System.out.println("deleted employee: "+emp.getName());
} catch(Exception ex) {
ex.printStackTrace();
if(transaction != null) transaction.rollback();
} finally {
try {if(session != null) session.close();} catch(Exception ex) {}
}
}
public static void main(String[] args) {
System.out.println("hello");
Hidemo hidemo = new Hidemo();
Employee emp = new Employee();
emp.setName("Babu");
emp.setDepartment("Security");
emp.setJoinedOn(new Date());
emp.setSalary(new Long(5250));
hidemo.insertEmployee(emp);
System.out.println("---------------------------");
List<Employee> empList = hidemo.getEmployeeList();
System.out.println("emp size: "+empList.size());
for (Employee e : empList) {
System.out.println(e);
}
System.out.println("---------------------------");
Employee empObj = hidemo.getEmployeeById(emp.getEmpId());
System.out.println(empObj);
System.out.println("---------------------------");
hidemo.deleteEmployee(empObj);
System.out.println("---------------------------");
empList = hidemo.getEmployeeList();
System.out.println("emp size: "+empList.size());
for (Employee e : empList) {
System.out.println(e);
}
System.out.println("---------------------------");
HibernateUtil.closeSessionFactory();
}
}
|
为避免运行程序后程序无法自动退出,调用HibernateUtil.closeSessionFactory();。
运行程序后,输出:
1
2
3
4
5
6
7
8
9
10
11
12
13
14
15
16
17
18
19
| inserted employee: Babu
---------------------------
emp size: 5
1 | Nataraja G | Documentation | 10000 | 2018-06-12 05:50:49.0
2 | Amar M | Entertainment | 12000 | 2018-06-12 05:50:49.0
3 | Nagesh Y | Admin | 25000 | 2018-06-12 05:50:49.0
4 | Vasu V | Security | 2500 | 2018-06-12 05:50:50.0
7 | Babu | Security | 5250 | 2018-06-15 15:38:06.0
---------------------------
7 | Babu | Security | 5250 | 2018-06-15 15:38:06.0
---------------------------
deleted employee: Babu
---------------------------
emp size: 4
1 | Nataraja G | Documentation | 10000 | 2018-06-12 05:50:49.0
2 | Amar M | Entertainment | 12000 | 2018-06-12 05:50:49.0
3 | Nagesh Y | Admin | 25000 | 2018-06-12 05:50:49.0
4 | Vasu V | Security | 2500 | 2018-06-12 05:50:50.0
---------------------------
|
参考资料
- http://java2novice.com/hibernate/read-write-example/
- https://zh.wikipedia.org/wiki/Hibernate
- https://stackoverflow.com/questions/21645516/program-using-hibernate-does-not-terminate
- https://blog.csdn.net/quan20111992/article/details/78377407